
Camera ready art is the term used in the printing industry that refers to a file that can be used “as is” (with no editing). Frequently our customers supply us with files they believe to be camera ready. Usually we find it necessary to adjust something on the file because it is not set up properly, and the client is unsure of how to fix it. In order to avoid press delays, please consider the following recommendations before sending your files to a service provider.
Set Up Your File at the Correct Size
The idea of supplying a Word file or PDF as a finished piece means it is ready to go to press exactly as it was provided. Files must be the correct final trim size, or if a bleed is used, it must include the bleed area.
I recommend that you use at least a quarter inch (.25) margin inside the document edge, creating a “safety zone” for elements that you do not want to get cut off when trimmed. Most presses have a gripper margin (the area the press “grips” the sheet) and anything falling within this area will not print.
Add Bleeds if Needed
What is a bleed? It is extra image or element which extends past the document’s edge.
Why do you need a bleed? Bleeds allow for any minor inaccuracy (such as printer bounce) when the document is trimmed to final size. Failing to provide adequate bleed means that the photo or background color you thought would run off the edge of the paper didn’t quite make it. The result is a thin area of white along the edge of the paper that looks like a mistake.
Set up your document with an eighth inch (0.125”) area that goes past the document’s edges. Make sure your artwork then extends into this area. If the program you are using doesn’t have an option to set a bleed, try creating your document with a custom page size that incorporates your bleed (for a letter size document, create a custom page size of 8.75” x 11.25”).
Check Your Files before Sending
Please review the document before sending it off to the printer. Double check the address, phone numbers, URLs, and dates (check a calendar to ensure day of the week aligns with the date).
It’s always a good idea to have another person review the document for something you may have missed. Just to be safe, check your document for spelling and grammar errors one last time before you send it to us. Most programs feature spell check, and in some instances also offer grammar check. You may want to save two versions of your final file – one that is editable, and one that has the text converted to outlines.
Use High Quality Photos
All photos and other raster art should be at least 300 DPI to ensure print quality. Low quality images will appear pixelated and blurry. If photos are taken using a digital camera, change the camera’s resolution setting to the largest one available.
Also consider stock photography sites like Shutterstock, Thinkstock, and iStock. Small, Medium, Large, and XLarge sizes of photos are available in 72 dpi (web images) and 300 dpi. The 300 dpi JPEG images you purchase and download from these sites are suitable for printing purposes. Just remember if you are sending your file to a commercial printer, the image needs to be CMYK (printing colors), not RGB as they are supplied by default (you’ll need Photoshop to convert it).
Adobe Software: InDesign, Illustrator, and Photoshop Files
If sending in a file using the Adobe programs, please use CMYK colors. If the job is a 2-color job, please use Pantone spot colors.
Package InDesign files to include fonts, images (links), and the InDesign file.
Text created in illustrator should be converted to outlines to avoid supplying fonts and to ensure that font errors do not occur. (NOTE: Type as outlines cannot be edited later if further copy changes are required.)
Do not make a font bold or italic by selecting the “Bold” or “Italic” from the application’s style menu. Use the actual bold or italic version of the typeface instead.
For layouts fully created in Photoshop, please provide the .psd layered version and name the layers accordingly. Remember to include any bleed that may be needed, and allow a minimum margin area of .125” preferably.
Spot Color Printing
For 1-, 2-, or 3-color jobs, use Pantone Coated or Uncoated colors. If the job is one color black, the artwork should be submitted as CMYK black, not RGB.
Line Thickness
Do not use hairline (.025) rules. Press operators prefer a minimum line weight of 0.5 point.
Exporting Files
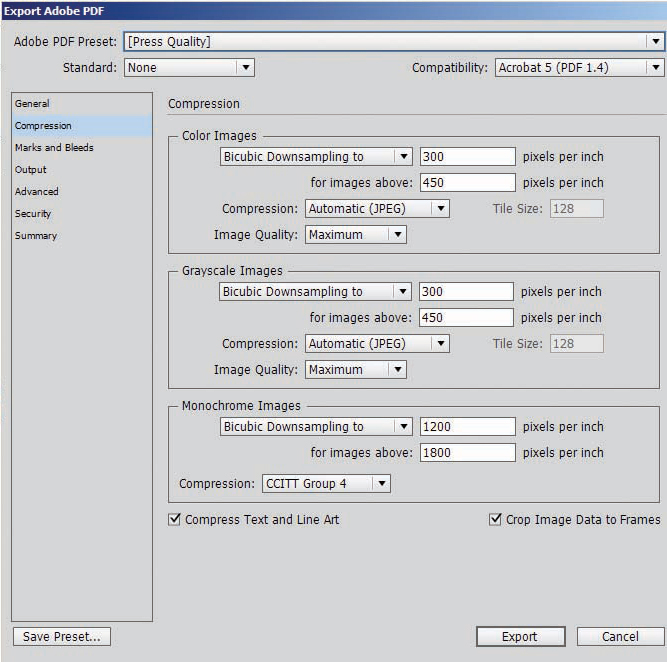
If you prefer to send a High Resolution PDF of your InDesign document, be sure to export as Press quality (see below), include the document bleed (if there is one), and crop marks.
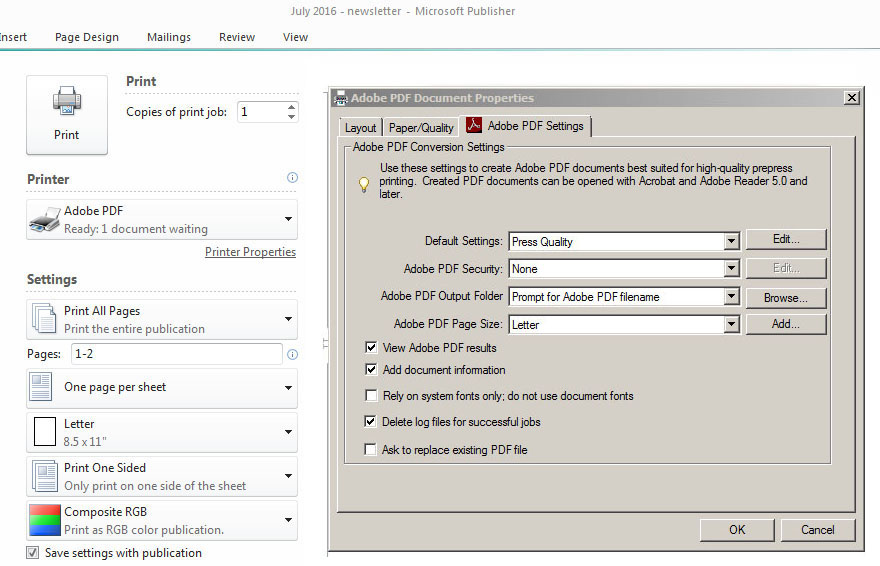
If you use Publisher, you can print the file as a PDF. Under the print feature, select Adobe PDF. Under printer properties, select Press Quality and select the correct paper size (see below).
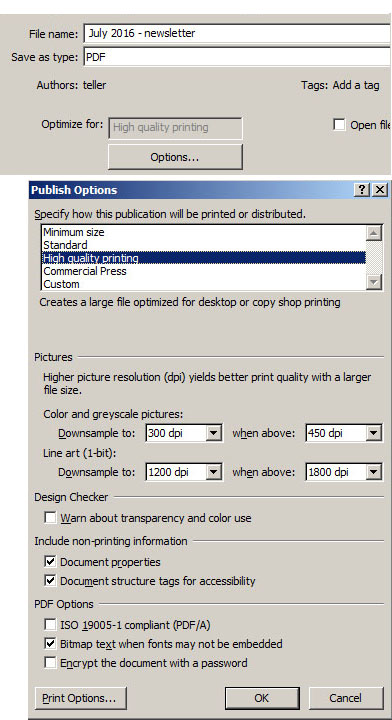
Or you could opt to save as a PDF:
If you use Word, there is an Acrobat tab at the top right. Hit that tab, then the create PDF button on the far left or you could Save as Adobe PDF.
File Submission
After you have checked and prepared the camera ready file, you’re ready to submit it. You can send your file via email to your account representative. If the file size is large, check with the vendor for FTP instructions. LKCS customers can visit our site lk-cs.com and click on File Upload in the Client Lounge.
Keeping these recommendations in mind, your next project should be good to go!
Did you like this blog post?
Get more posts just like this delivered twice a month to your inbox!
